May 25, 2011

PTI May 2011 Blog Hop


Welcome to the PTI Blog Hop where this months challenge is flowers.


I created a flower out of ribbon.  I used the new Glubers by Cosmo Cricket to create this rolled flower from 1 1/2" inch wide ribbon (sorry, I forgot to measure the length of the ribbon before I started making the flower).  I die cut some spring moss cardstock with the Delightful Dahlia leaves to adhere behind the flower and hot glued some pearls I purchased in the jewelry section at Joann's in the center.

I attached the flower to a piece of  white cardstock die cut from a nesties die and stamped with a sentiment from Birthday Basics in black ink.  I used a white card base and attached the patterned paper by Paper Salon then added a strip of rasberry frizz cardstock that was impressed with the Basic Backgrounds Diamond impression plate.

Thanks for stopping by and happy hopping!

May 20, 2011

Hello from the heart


Hello Everyone!!!

I know, long time no post. Sorry about that, I have been playing in my happy room but I just have not had the extra time to post anything here on the old blogaroony.  But I'm here today to show you a little number I made the other day.


I just love this paper from Crate Paper.  I wanted to pull some of the colors from the floral part so I made a card base from aqua mist cardstock, the yellow checked is the back side of the floral.  I die cut a piece of  pure poppy bitty dot paper with the Mat Stack 3 die. I also die cut a piece of aqua mist cardstock with the eyelet lace border die.  I stamped the sentiment from vintage picnic in black ink and added the cute little bumble bee from the Tag It #3 set.

The flower is made from some white muslin and the leaves are die cut from some new leaf cardstock with the Sending You leaf dies. Before attaching everything to the card base, I added some lace for a bit of a vintage look.  The focal image is attached using some foam pop dots.

I'm hoping to post some more projects this weekend, so until then, thanks for stopping by and enjoy your weekend.

April 12, 2011

Easter Baskets

Hi Everyone!  I have another Easter project for you today.  I always like to make the girls in the office a little something for each major holiday and this year I decided to make them each little Easter baskets filled with treats.


The free basket template I got over at Waltzingmouse, it was very easy to assemble.  Again I chose to use pastel colors in Lemon Tart, Sweet Blush, Spring Moss, Melon Berry and Aqua Mist.


For the front of the basket I die cut  flowers from Pretty Pastels paper with the Bloom Builders #2 medium flower, Limitless Layers die to cut cardstock to match the basket.  Stamps used are Limitless Labels egg, Tag It #1 frame and Egg Hunt sentiment.  After stamping all my images I used a 1 3/4" punch to cut them all out.  I cut a white doily in half and attached it to the back of the flower.  (click on the photo for get a better view) 

Once everything was assembled I added some white grass and chocolate Easter eggs (yum).  Of coarse I had to sample the chocolate to make sure it was good, wink!  I can't wait to give these to the girls next week. 

Thanks for stopping by!

April 11, 2011

Happy Easter

Hi Folks, I know it's been awhile since my last post.  Now that the weather is getting nicer, I'm trying to get outside to do a bit of yard work after this long cold winter.

I was able to get a few things made in my happy room and I'd like to share one of them today.  Here is my Easter cards for the family this year.


Pastel colors remind me of Easter, so what better paper to use than Pretty Pastels by PTI.  I used all of the different colors of paper in the pack to create the background of this card as well as the eggs die cut with the egg die also from PTI.  To create the basket I used Fine Linen cardstock and my Coluzzle oval template.  I cut the oval in half and cut a bit of the bottom off to form the base of the basket.  I used the same oval template to create the handles as well.  I then ran it through my Cuttlebug using the picnic plaid impression plate. I added some foam pop up squares to the middle of the basket to make it look like the basket is full then added scor tape to the sides .

Before I attached it to the card base I added the eggs, I added some foam pop squares to the two eggs in the front to add a little dimension.  To decorate the front of the basket I cut a piece of spring moss cardstock and added a decorative border with a Martha Stewart border punch.   I added some trim from my stash, a tag stamped from a Mega Mixed Messages sentiment tied with a bit of rustic cream twine and a flower from Prima that I added a  pearl to the center.

I hope you enjoyed my project today, I'll have another Easter project for you tomorrow so be sure to stop back then.

March 19, 2011

Happy Belated St. Patrick's Day

Better later then never, huh!  Sorry it's been so long since my last post, it just seems like there is not enough time in a day.

I wanted to share the St. Patrick's Day cards I sent to the fam.  I used the Luck of the Irish mini stamp set from PTI to create this little number.


The supplies I used were:  spring moss, ripe avocado and rustic cream cardstock, Mat Stack 2 die and stamp set,  linen/canvas impression plate, shamrock die from Quickutz, spring moss and ripe avocado ink, circle punches, corner chomper and foam pop dots.

Enjoy your weekend, I'm off to the laundry mat as my dryer died on me last night and I have six loads of laundry that need dried.  Just what I wanted to do on a Saturday morning.

Thanks for stopping by.

February 28, 2011

Handmade patterned paper and felt flower

Happy Monday Everyone! 

I got the inspiration to make this card from some patterned paper I saw online and a great flower tutorial.


I created this background on lemon tart cardstock using the medium flower stamp from Beautiful Blooms II where I stamped the image using the back of the stamp to give me this scalloped circle.  I then pulled out the Guideline Two set and stamped various images in the middle of the circle and  filled the empty spaces with a small flower stamp for Beautiul Blloms II.   The color inks I used were aqua mist, spring moss, orange zest, hibiscus burst, ripe avocado, hawaiian shores, shappy pink from Color Box and a purple ink that has no name.

I wanted to give this card a bit of a vintage feel so I distressed the edges with chai ink, embossed it with the linen/canvas impression plate and added some lace and berry sorbet twill ribbon before I attached it to my berry sorbet card base.

Now for this delicious felt flower,  I have a shout out to Eva for the great tutorial she posted for the blog hop found here .  I couldn't believe how fast it all came together.  I added a  button from my stash to add to the vintagie feel I was going for.  I attached the flower to a piece of spring moss cardstock using the Mat Stack I die then added some foam pop dots to the top and bottom of the cardstock before adding this final touch to the card.  You probably noticed that I did not use a sentiment, I figured I would add this later for the proper occasion.

Thanks again Eva for the great tut, now I'm off to make more flowers but this time I'm going to try this with some fabric.  I'll let you know how they turn out.  Until then, thanks for stopping by.

February 27, 2011

Best Wishes

Happy Sunday,

Just playing around in my happy room today and came up with this card.


I love all of the elements in the Mat Stack 2 stamp set especially this flourish.  So I decided to create a background using this stamp.  I love how it turned out and will have to try it in different colors. 

I just simply stamped this image on white cardstock using Versafine onyx black ink.  Before attaching it to a white card base I wrapped a piece of black ribbon I had in my stash around to stamped piece.  Using the Mat Stack 4 die I cut a piece of raspberry fizz then embossed it using the linen/canvas impression plate.  I die cut a piece of white cardstock using the Mat Stack 2 die then stamped the image and sentiment in black ink and attached some black rhinestones on each end.  I used some foam pop dots to adhere my focal image to the card.

Thanks for visiting and enjoy the rest of your Sunday.

February 25, 2011

PTI Blog Hop


This months challenge is scallops. For this card I used the small and meduim scallop dies and the Limitless Layers die.

I chose these colors from the fabric flower I made.  I picked up some fat quarters at JoAnn's the other day and tried to match them with my collection of PTI felt.  I liked this fabric because of the different colors I can match up.
 If you look closely at the card, I embossed the hibiscus burst with the picnic plaid impression plate and the dark chocolate scallop with the linen/canvas impression plate.  I ran two score lines down the raspberry fizz scalloped piece.
I tucked a piece of raspberry fizz felt behind the flower using the Limitless Layers die.   The sentiment is from Communique Curves.

Thanks for hopping over!

February 23, 2011

Make it Monday challenge #3

This weeks Make It Monday challenge is to add glitter strips using Scor Tape.


Supplies

Stamps:  Around & About Sentiments
Ink:  dark chocolate
Paper:  kraft, dark chocolate, melon berry
Other:  terracotta tile felt, beautiful blooms die, button, floss; Cuttlebug embossing folder, wood grain impression plate, Martha Stewart chocolate glitter

February 20, 2011

Anniversary Butterfly

Hi Folks,

I hope everyone had a nice weekend.  I have a quick post for your this evening with a card I made using the butterfly dies from PTI.


To create the butterfly I used some white tissue paper and folded it several times to give me lots of layers and ran it thru my Cuttlebug using the Signature Series Butterfly.  Then I used the small butterfly and die cut a piece of the patterned paper from Pretty Pastels and attached it to the tissue paper butterfly with my sewing machine.  The antennas were made from these white little wire pieces with the tips (sorry, I don't know what the proper name is) found in the floral department of my local craft store. To finish off the butterful I added some white pearls.

 By using white embossing powder,  I created the large flourish from Fancy Flourishes on a lavender moon card base.  The sentiment is from Damask Designs stamped in smokey shadow.   I rounded off the bottom corners with my corner chomper and attached the butterfly using some score tape.

I love how simple but elegant this card is, perfect for any anniversary.  Thanks for stopping in and have a good week.

February 13, 2011

Valentine Banner

You know, I just can't pass up Valentines Day without a banner for my craft room.  So I whipped one up last week and have it hanging in all it's pinkish glory.  It was all about pink this year for Valentines Day instead of red.  So I went through my stash of patterned paper and pulled out some pink paper for the banner flags.

 I also went thru my stash and pulled out some frilly embellishments and glittery goodness.

I matted my silver glitter letters to die cut cardstock using a bunch of different shaped dies from PTI.  I just love those things. That big pink heart is from Melissa Frances.
 
 Here is a close up of on of the banner flags.  As you can see I used a piece of white tulle at the top where I tied a piece of white string to in the middle then added a pink glitter heart.  I cut doilies in half and added them underneath a piece of cardstock using different border punches.
I'm already starting to think of a spring banner.  Our winter has been miserable and I am soooo ready to see green and everything  in bloom.

February 12, 2011

Valentines Treats

Here are some Valentine treat boxes I made  for the girls in the office. I made a total of 10 but I wanted to show you the three different colors I used.


I chose not to use any red this year for all of my Valentines projects instead I went with pinks.  Here I used sweet blush, hibiscus burst and raspberry fizz for the treat boxes.  I die cut various patterned paper using PTI Mat Stack #3 die and used some pop dots to attach is to the box.  The glittered hearts are from Melissa Frances.  I made a little banner to stamp my sentiment on, added some pink rhinestones and glued it to the die cut paper.


If you look close you can see where I stamped little hearts in Versamark ink randomly on the boxes.  I did this before I assembled the box.  I then filled the boxes with treats (chocolate included) and  some iridescent basket filler.  I can't wait to hand these out on Monday.

February 11, 2011

Happy Valentines Day


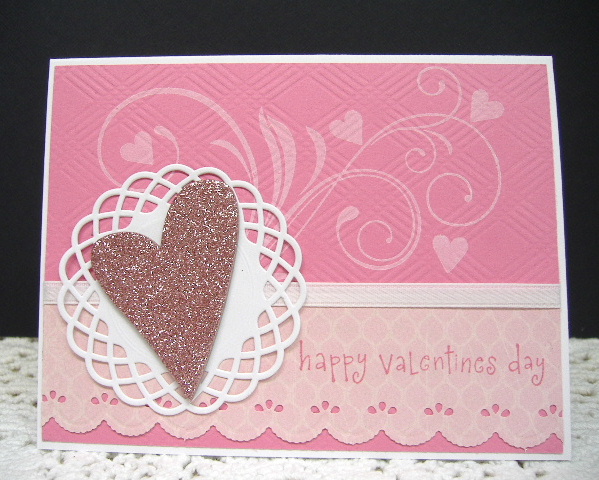
Here's my Valentines Day card I just sent out to the family.  I generally send out about 5 cards and I do make them all the same.  The glittered heart is from Melissa France and the doily is Martha Stewart.
 

The large flourish from Fancy Flourishes as well as the heart from the Around and About set was stamped in fresh snow ink on to hibiscus burst cardstock.  I then ran the cardstock thru my Cuttlebug using the PTI picnic plaid impression plate.  Before  I attached a piece of patterned paper (sorry don't remember who it's from) to the bottom portion of the card I used a Martha Stewart border punch and also wrapped a piece of white ribbon around the top. The  sentiment was stamped in hibiscus burst.  I picked up that stamp at Michael's a few years back.  Everything was adhered to a white card base.  Stop back tomorrow where I'll show you the little Valentines favors I made for the girls in the office.


February 9, 2011

Make It Monday Challenge

(I have 2 posts today so make sure you scroll down and check out the second one.)

Here's a look at my Go-To Sentiment card for the Make It Monday challenge over at PTI.


I had fun going thru all of the stamp sets to pick out just the right thank you sentiments for this card.  The sentiments were from Communique Curves, Faux Ribbon, Beyond Basic Borders, Mixed Messages and Delightful Dahlia.  I created different sizes circles using the Circles Nesties and my Cuttlebug.  The color cardstock I chose were hawaiian shores, spring moss, hibiscus burst, white and orange zest and they were all adhered to a harvest gold card base.  I used a piece of hibiscus burst bitty dots paper and die cut the butterfly from PTI.

I'm looking forward to see what next Monday's challenge will be.

PTI color challenge

Hi Folks,

Today, Papertrey Ink has issued a color challenge and I've chosen to use Michelle Wooderson's colors of Aqua Mist, Sweet Blush, Harvest Gold and Simply Chartreuse.  Here is a pic of her projects


and here is my project .  I stamped Background Basics Text Style with distressing ink on to vintage cream cardstock then cut a piece of Simply Chartreuse and used a Martha Stewart border punch on each side.  I then wrapped some rustic twine around a few times before adhering to the card base.  I die cut the butterflies with a PTI die then used the canvas/linen impression plate to give them a little texture.  Some foam pop dots were used to attached the butterflies to the card and I added some pearls for a final touch.


I look forward to using the other color combos in the future.  Thanks for stopping by.

January 27, 2011

Birthday Stars

I have a quick and easy card to show you today.  I decided to use masculine colors for this one but by changing the colors you can create girly cards or cards for the kids.


For the top of the card I used the wood grain impression plate, the bottom I attached some bitty dots paper in enchanted evening. I ran a 1/2" strip of dark chocolate cardstock through my crimper to add as well.  I die cut some harvest gold felt with the large star die, then die cut  white cardstock using a nesties die. 


The sentiment is from Make a Wish set stamped in enchanted evening and the star is from Star Prints stamped in lemon tart ink.

January 26, 2011

birthday wishes

I was on a roll making birthday cards to have on hand and also for an order I got from my sister. 


This set is from the Limited Edition 2010  CHA from PTI.  The leaves are stamped in spring moss and the flowers in hibiscus burst.  I also added some Martha Stewart crystle fine glitter to the flowers.  The sentiment is stamped in smokey shadow.  I tied some hibiscus burst satin ribbon around the white cardstock before attaching it to the hibiscus burst card base.  I used my corner chomper to round the bottom corners.

Thanks for visiting today!

January 25, 2011

January PTI Blog Hop


This month's challenge is to use a stamp set that has not been used yet or one that has not been used for awhile.  I decided to use the Papertrey stamp set for my project which has not seen ink or the light of day for quite some time..  This was the very first set I purchased from PTI back in 2007.   I have been a fan and follower ever since. 


Hibiscus Burst cardstock was used for the base where I created a background using that cute little flower which was stamped in Fresh Snow ink.  I then wrapped a piece of Spring Moss stitched ribbon around the card.  For the focal image, I used the Mat Stack 3 die on white cardstock and stamped the sentiment in Smokey Shadow.

To create the flower I repurposed the tissue paper that comes in between the sheets of the clear cardstock and die cut several layers using the Beautiful Blooms #2 in the large and medium size.  I attached all the layers using a fabric brad I had in my stash.  The leaves where die cut from the Delightful Dahlia die set on a piece of patterned paper from the Pretty Pastels paper collection.  I also used a Limitless Layers die to cut another piece from the same collection.   I adhered everything together using some Scor tape then used some foam pop dots to adhere to the card base.  To finish everything off I rounded the bottom corners with the Corner Chomper.

I'm excited to see what everyone else will be showcasing today.  Thanks for stopping by and Happy Hopping!

January 24, 2011

Birthday Gifts

I recently ordered the Make a Wish Stamp sets with the matching dies from PTI and I have to tell you that I have been having a ball making birthday cards. Today I'm going to share two of the cards I made using my new goodies.

I decided to use soft pastel colors for the first card.  I have to admit, I CASED this card from Betsy Veldman.  She made something similar to this and I just fell in love. Vintage cream cardstock and swiss dots embossing folder was used for the base and I added a strip of bitty dots paper in lemon tart and cut the scallop using the small scallop die from PTI.  The sentiment was stamped in smokey shadow.


I used the Pretty Pastels and Bitty Dots paper in lemon tart to die cut all of these lovely packages. On some of the packages I added a little strip of  vintage cream cardstock using decorative edged scissors.  I found in my stash some pastel pearls (I think I got them at Michael's) and I know that this would add a nice accent.  Chamomile die ink was used to distress the edges a bit.


For the second card I went with more bold bright colors.  The patterned paper is from Scenic Route that I've had in my stash for a while.  It's had to see in the photo but I embossed lines done the middle of each color using my Scor Pal.

 The sentiment is from Birthday Basics stamped on a banner accented with Rhinestones.  I rounded all the corners using my corner chomper.


To create the packages I used new leaf, orange zest, hawaiian shores, hibiscus burst, spring moss and pure poppy cardstock.  I added some glitter to the bows for a little added punch.  I attached everything using foam pop dots.

Thanks for stopping by!

January 23, 2011

Rope Medallion

I used rope to create this focal image and I wasn't quite should what to call  it so I decided on a Rope Medallion.


To make this medallion I die cut a felt circle using my nesties circle die. Then took some cotton rope that is about 1/4" thick and started creating a circle glueing every so often using Fabric-Tac.  I stopped wrapping when I got to the size I wanted.  I then added an aqua pearl accent to the middle.  Every simple and easy to make.

For the card base I used Hawaiian Shores cardstock.  To give it some texture I cut a piece of burlap a little bigger that the size of the card and ran it through my Cuttlebug.  It's hard to see in the photo but it does add a subtle texture.  I die cut and stamped a piece of white cardstock using the Mat Stack I collection.  The ink I used is VersaMagic sahara sand.  I stamped the flourish with Versamark and the sentiment with hawaiian shore ink.  Adding some bitty dots paper in hawaiian shores to the bottom of the card and cut a 1/2" strip of kraft cardstock and attached it behind the focal image finished off the card.  Oh, and I also rounded the bottom corners with my corner chopper.

Thanks for visiting.

January 22, 2011

Sparkle

Hi everyone!  Sorry for my long absence, time just got away from me with the holidays, working and everything, then my father and I were down with the flu but all is well again.  Today was the perfect day to be inside and work in my happy room.  The temp was 0 degrees when I woke up this morning, brrrrrrr.

Anyway, I thought I would share my winter banner that I have hanging in my studio.  Where I have the banner hanging in the photos is not where I actually hung the banner,  this was the best place to get some decide shots of it.


I used a variety of winter theme patterned paper for the banner and the medallions. 


There's lots of "sparkle" on this banner, from the letters to the silver tinsel and Martha Stewarts crystal tinsel glitter.  I had that stuff all over the place.  The felt scalloped border even had silver glitter in it but I had to add more tinsel glitter to it.

I die cut some felt snowflakes and added silver snowflake brads in the middle.  This was such a fun project to work on.  Stay tuned when I'll have more projects to show you this week.

Enjoy your weekend and stay warm!