October 26, 2009

Gift bags in a hurry

edit:  A question was asked as to how I attached the bows to the bags.  First I used my pinking sheers to give a finished look to the top of the bag then I simply used a hole punch to punch 2 holes and threaded my ribbon thru and tied in a bow.  Hope this helps! 


My sister asked me if I would make up some little bags for her that she needed in a hurry.  I only had a couple of days to work on them.  So I work a full time job and only had a couple of hours in which to get these finished.   It's not my best work but for a last minute job it worked and my sister was happy. 


I couldn't make it easy on myself and make them all the same. Oh no, I had to make each bag different.  There were 18 bags and each bag had a different image.  Thank goodness they were all for women and I knew flowers would work, so I pulled out every floral stamp I had from PTI and got to stamping.  I made these awhile ago and forgot I had taken a pic of them so I thought I would share it with you. 

October 25, 2009

October PTI Blog Hop


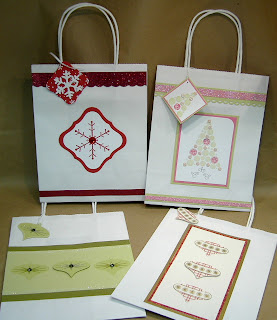
I'm so excited for this months blog hop. It's time to showcase our holiday plans for cards, gifts, wraps, etc.  So tonight I'm showing you some gifts bags I've been working on. I have several more to do but I wanted to have something to post for the hop.


I picked up these white gift bags at Michael's which have 13 in a bundle and I used a 40% off coupon so each bag came to about 27 cents a piece.  For these four bags I used Snowfall, Tree Trimming Trio and Vintage Ornaments & Additions stamp sets. Here's a close up of them all and I must say it's all about the glitter this year.  I just love how they sparkle and what's Christmas without a little sparkle.


Thanks for hoppin by tonight,  I can't wait to see what everyone has been designing.

October 24, 2009

Halloween Treats

I picked up these buckets awhile back at Target in their dollar spot section.  I was there the other day and picked up some red ones that I thought I could use for Christmas.  I made these little treats for my niece and nephews for Halloween.


My one nephew likes Sponge Bob and I found this candy dispense and knew it would fit perfect in his little bucket.  I use the Spooky Sweets stamp sets to created the label for the front of the buckets as well as the glassine bags and tags for the goodies inside.


I then wrapped then all in some cellophane, tied with true black saddle stitched ribbon and a pumpkin gift tag.  I hope they enjoy all their goodies as much as I did making them.

October 19, 2009

Papertrey Goodies

Just arrived today and I thought I would share with you my PTI goodies before I tear into them.


I thought it was very sweet of PTI to include a nice notepad with my order. Thanks PTI! Okay, I'm off to play.

October 18, 2009

Timeless Templates

First, I'd like to apologize for being absent from here for so long. Sometimes life just gets in the way. So with that being said I'd like to share a project that I made for my sister for her birthday. I just love the Timeless Templates. There is so much you can do with them. I made my other sister a set like this except I used the pure poppy Green Tea Leaves patterned paper.


In the Pack a Picnic box I added some bath gels and lotions. I love the accordian flower I added to the top.


The Card Couture box is filled Celestial Seasonings tea bags which are a perfect fit. I used magnetic snaps by Basic Grey to help keep the flap closed.


This is the newest template which is called Cash and Carry. I like that you get three templates in this set. In my stash I had these Folio Closures by Colorbox that I used to help keep the box closed. This box is used to house a gift card.


My only concern with this box is that the bottom was open and I was afraid that the gift card would fall out. So I added the patterned paper that wraps all the way around the box. This will ensure that card stays in place. Lauren also had an idea to make a belly band that fits around the box. I'll have to try that for my next box.


Lastly, I had to make a card to coordinate with this set. I just love to make these accordian flowers. The embossed image on the spring moss cardstock is from Cuttlebug and I added a couple of score lines at the top and the bottom.


I hope you enjoy my projects today and thanks for stopping by.
October 3, 2009

World Card Making Day 2009


For the final leg of our tour with PTI's WCMD challenge we're heading down under to Australia.


For this card I used an Orange Zest card base, stamped the large flourish from Fancy Flourishes in dark chocolate. To add an Aborigine look I used my white gell pen to add the dots around the flourish. I cut a piece of dark chocolate cardstock and punched the bottom with a Martha Stewart punch and placed it at the bottom of the flourish. I also added some white dots to the zig zag.

Well that's it for the tour, I sure did have a blast. Thank you for stopping by and joining me while we took a trip around the world.

World Card Making Day 2009


Our next stop in the PTI WCMD tour is India.


For this card I used scarlet jewel for the base and ran it through my Cuttlebug with an embossing folder. The focal image is from the Damask Designs stamped in gold but it's hard to tell in the photo. I cut the image out using the Nesties Label One die and attached it with some pop dots.

World Card Making Day 2009


Our next stop in the PTI WCMD challenge in Mexico.


For this card I used new leaf cardstock for the base. On some white fabric, I used a stamp from Backgrond Basics Star in Hibiscus Burst. Then added a piece of summer sunrise on the top and used my sewing machine to add a zig zag stitch. I took a flower from my stash and finished it off by using the Around and About stamp set in summer sunrise and the green is a Palette ink but I don't know what the color is (sorry) then took a single image from the Background Basics Star set and stamped it in Hibiscus Burst.

World Card Making Day 2009


To celebrate World Card Making Day 2009 I've decided to join the challenges over at Papertrey Ink which can be found on Nichole's Blog. We are taking a trip around the world with our first stop to Japan.


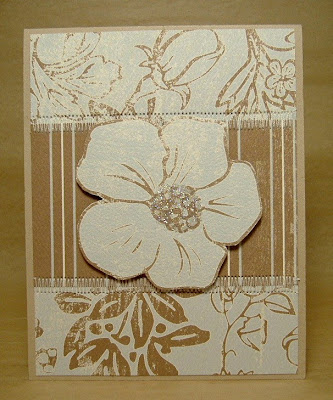
I have to be honest, I've had this card in my stash for awhile and can not remember who makes the paper. I do remember cutting out the flower from the paper and used some coordinating paper behind it and added some machine stitching. I used some pop dots to adhere the flower and to finish it off I used some Stickles in the center.

I'm excited to see where our next stop will be. Come aboard and join us. See you in our next port of call.