Showing posts with label Birthday. Show all posts

June 29, 2011

Happy Birthday


This lovely flower was actually made from some ribbon I had in my stash.  I just love how it turned out.  I used the Bloom Builders #2 dies to create the flower and the leaves were cut from the Delightful Dahlia dies using some Pretty Pastels paper.  To finish off the flower I added this gold and pearl button.


I used the picnic plaid impression plate on some vintage cream cardstock, added some Green Tea Leaves paper where I used the scallop border punch from EK Success.  I die cut another piece of vintage cream paper using the Fillable Frames #4 die as well as the frame stamp which is stamped in spring moss.  The sentiment is from Wreath For All Seasons stamped in melon berry.
Thanks for visiting and have a beautiful day!

June 27, 2011

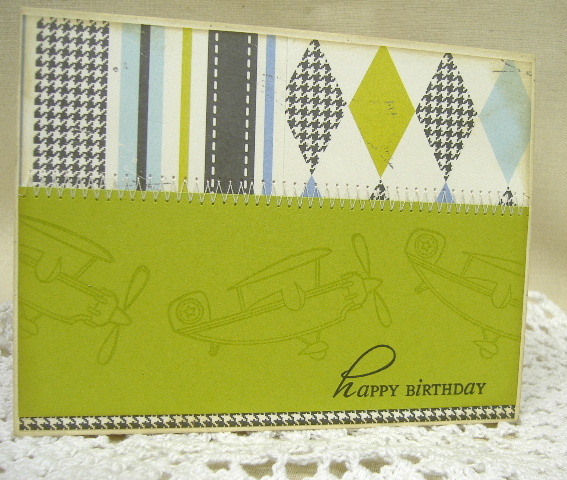
Masculine Birthday

Hello everyone,

Today I have a card suitable for the male in your life.  I think you can use this card for any age.

The patterned paper is from Making memories 5th Avenue line paired with some simplye chartreuse.  I added a little zig zag stitched with the sewing machine and stamped the airplane from Fly Away in versamark ink.  The sentiment is from the Make a Wish set stamp in black ink. To finish off the card I destressed the edges.

Thanks for stopping by!

June 26, 2011

Watering Can

Hi folks!

It's hard to believe that it's been a month since my last post.  Boy time sure does fly.  I have a few cards to share with you today using the watering can from Green Thumb stamp set. 


You'll notice that I've created these two cards using basically the same layot but using different paper and sentiments.


This first card I've used doubled sided patterned paper from GCD Studios, Mat Stack #4 cut from Rustic cream cardstock.  

 I stamped the watering can with Studio G pigment ink, the flowers are from the Tag It #3 where I used my Tombow markers to color the stem and leaves in one color and the flowers in another.  I also added some small pearls to the center of the flowers.  The sentiment is is from the Round and Round stamp set stamped in dark chocolate ink.

 For this card I used the same layout using Prima and My Mind's Eye paper.

The watering can is stamped with Studio G pigment ink, again I used my Tombow markers for the flowers and stems and also added small pearls.  The sentiment is from Fillable Frames #4 stamped in Colorbox antique pewter.

Thanks for visiting today!

January 27, 2011

Birthday Stars

I have a quick and easy card to show you today.  I decided to use masculine colors for this one but by changing the colors you can create girly cards or cards for the kids.


For the top of the card I used the wood grain impression plate, the bottom I attached some bitty dots paper in enchanted evening. I ran a 1/2" strip of dark chocolate cardstock through my crimper to add as well.  I die cut some harvest gold felt with the large star die, then die cut  white cardstock using a nesties die. 


The sentiment is from Make a Wish set stamped in enchanted evening and the star is from Star Prints stamped in lemon tart ink.

January 24, 2011

Birthday Gifts

I recently ordered the Make a Wish Stamp sets with the matching dies from PTI and I have to tell you that I have been having a ball making birthday cards. Today I'm going to share two of the cards I made using my new goodies.

I decided to use soft pastel colors for the first card.  I have to admit, I CASED this card from Betsy Veldman.  She made something similar to this and I just fell in love. Vintage cream cardstock and swiss dots embossing folder was used for the base and I added a strip of bitty dots paper in lemon tart and cut the scallop using the small scallop die from PTI.  The sentiment was stamped in smokey shadow.


I used the Pretty Pastels and Bitty Dots paper in lemon tart to die cut all of these lovely packages. On some of the packages I added a little strip of  vintage cream cardstock using decorative edged scissors.  I found in my stash some pastel pearls (I think I got them at Michael's) and I know that this would add a nice accent.  Chamomile die ink was used to distress the edges a bit.


For the second card I went with more bold bright colors.  The patterned paper is from Scenic Route that I've had in my stash for a while.  It's had to see in the photo but I embossed lines done the middle of each color using my Scor Pal.

 The sentiment is from Birthday Basics stamped on a banner accented with Rhinestones.  I rounded all the corners using my corner chomper.


To create the packages I used new leaf, orange zest, hawaiian shores, hibiscus burst, spring moss and pure poppy cardstock.  I added some glitter to the bows for a little added punch.  I attached everything using foam pop dots.

Thanks for stopping by!

January 23, 2011

Rope Medallion

I used rope to create this focal image and I wasn't quite should what to call  it so I decided on a Rope Medallion.


To make this medallion I die cut a felt circle using my nesties circle die. Then took some cotton rope that is about 1/4" thick and started creating a circle glueing every so often using Fabric-Tac.  I stopped wrapping when I got to the size I wanted.  I then added an aqua pearl accent to the middle.  Every simple and easy to make.

For the card base I used Hawaiian Shores cardstock.  To give it some texture I cut a piece of burlap a little bigger that the size of the card and ran it through my Cuttlebug.  It's hard to see in the photo but it does add a subtle texture.  I die cut and stamped a piece of white cardstock using the Mat Stack I collection.  The ink I used is VersaMagic sahara sand.  I stamped the flourish with Versamark and the sentiment with hawaiian shore ink.  Adding some bitty dots paper in hawaiian shores to the bottom of the card and cut a 1/2" strip of kraft cardstock and attached it behind the focal image finished off the card.  Oh, and I also rounded the bottom corners with my corner chopper.

Thanks for visiting.

November 21, 2010

Happy Brithday

Happy Sunday Everyone!  I hope your having a wonderful weekend.  I have a little birthday card to share with you today that I made for my nephew's 8th birthday.  I was inspired by a card Nichole Heady made a few months ago featuring PTI's new star dies. 

 Here I cut red felt with the largest die, the middle star from summer sunrise cardstock and the smallest with simply chartreuse cardstock then I stamped a polka dot star image from Star Prints with versemark ink.  The white cardstock was run through my Cuttlebug using the swiss dots embossing folder.  I embossed the top part and the bottom leaving a space towards the bottom blank so that I could stamp my sentiment which is from Birthday Basics.  I ran a score line above and below the sentiment with my Scor Pal.  I then attached two little rhinestones with my glue pen.  The card base is enchanted evening cardstock.


Lastly, I added a button to the middle of the star.  Thanks for stopping by and enjoy the rest of your weekend.

October 18, 2010

Scottie Birthday

My niece will be celebrating her 4th birthday next month and I wanted to created something different for her card.  I saw something similar to this somewhere on the world wide web but for the life of me I can't remember where.


I cut the scottie shape from true black cardstock, the scarf was cut from some paper I had in my stash, the button is PTI pure poppy vintage button.


I used a black pearl for his/her eye and cut an oval for the nose.  It's hard to believe that 4 years ago my niece was born premature weighting in at 1 lb. 7 oz. and  now she is a healthy and happy little lady.  She's our little miracle baby.

October 4, 2010

Delightful Dahlia

I made this little number for my sister for her birthday.

The color sceme for this card was based on the fabric brad that I used for the center of the flower.  I used the picnic plaid impression plate on some orange zest cardstock.  Die cut a piece of vintage cream cardstock with a Fillable Frames die.  The ink I using was spring moss and orange zest.  The sentiment is from the Communique Curves.  I used some Pretty pastels paper to die cut the leaves.


I just love the dies that coordinate with the Delightful Dahlia stamp set.  I decided to make my flower from vintage cream felt (gotta love this stuff, great quality) and attached that lovely fabric brad to the center. 

Until next time
Hugs
Lisa

August 22, 2010

Golfers Birthday

Hi everyone and Happy Sunday.  I have a little post for you today which involves a card I made for my brother's birthday.


My brother is an avid golfer and I found this golf club embelly in my stash and thought it appropriate to use for his card.  I also paired it up with Vintage Labels stamped in ripe avocado and Labels One nesties.


What else goes with the golf look but argyle and what better stamp to use but the Little Argyle set.  I used spring moss cardstock and stamped the argyle pattern with spring moss and ripe avocado ink.  I also used the an embossing folder from Quickuts.  The card base is rustic cream cardstock. 

Well thanks for joining me today, enjoy the rest of your Sunday.
Hugs
Lisa

August 12, 2010

Yo-Yo embellies

Hi folks, it's almost Friday Yippee!!!  I thought I would pop in with a few cards to share with you.  I found a couple squares of fabrics the other day and I thought I would give a try at making some yo-yo's.


It's hard to see in this photo but the fabric has yellow in it and a grey script. 


This card does look pretty in person. For some reason this card did not photo very well.

Supplies:

Stamps:  Birthday Basics
Ink:  Versamark
Paper:  Lemon Tart, Smokey Shadow
Other:  White embossing powder, medium scallopped die, Scor Pal, Cuttlebug embossing folder, fabric, button from stash, yellow floss.
Finished size: 4 1/4" x 5 1/2"


I pulled all the colors of the fabric together to create my next card.


Supplies:

Stamps:  Birthday Basics, Fancy Flourish, Vintage Label, Polka Dot Basics I
Ink:  Ripe Avocado, Orange Zest
Paper: Orange Zest, Spring Moss, Ripe Avocado
Other:  Mat Stack I die, large scallopped die, Orange Zest twill ribbon, button, fabric

I loved how these yo-yo's turned out and they were very easy to make.  I'll be on the hunt for some more fabric that will coordinate with my PTI cardstock.

Hugs
Lisa

August 2, 2010

Birthday and Gift card

Hi everyone!  I have a little birthday card and gift card to share with you today that I made for my sister's birthday.  

  I cased the card from Nichole when she was previewing the Delightful Dahlia stamp set back in March.  I changed just a few things but the layout is the same. The gift card holder is from the My Timeless Templates Cash or Charge Collection.


For the card I used of course the Delightful Dahlia set with coordinating dies.  The flower is stamped in berry sorbet and the leaves are die cut from Pretty Pastels paper pack.  The sentiment is from Damask Designs stamped in berry sorbet onto vintage cream cardstock die cut from the Fillable Frames #4 along with the border from #4 stamped in spring moss.  The background is berry sorbet where I used the picnic plaid impression plate.


Next is the gift card holder.  I used berry sorbet cardstock impressed with picnic plaid.  The green paper is from a Making Memories paper pack.  The base of the holder in vintage cream cardstock and I tied it together with some silk ribbon.


For the slider, I attached an envelope that I made to house the gift card and attached a berry sorbet button.


The gift card fits perfectly inside the envelope.  First I ran the envelope through my Cuttlebug using the swiss dots embossing folder before I attached it to the slider.  I hope my sister likes this as much as I enjoyed making it for her. 

Thanks for stopping by!

Hugs
Lisa

May 19, 2010

How about a little masculine

Card that is.  I have alot of men in my life (family) and I'm always struggling with making birthday cards for them.  Here is one I made the other day which came to get rather quickly I might add.

 I picked up this patterned paper the other day at my LSS, I thought it would look good on a manly card.  I attached it to a kraft card base and cut out all the corners using a punch (sorry no sure what the name of the punch is).  I embossing some smokey shadow cardstock using a Cuttlebug embossing folder.


For the focal image I used the Nesties Label One die and the Vintage Labels set stamped in Versa Magic's sahara sand ink.  The sentiment is from Damask Designs stamped in smokey shadow. 

Well that's one manly card done and lots more to go so I better get crackin. 

Hugs
Lisa

May 17, 2010

Happy Happy Birthday

I always seem to have a hard time making little boy's birthday cards and I don't have any in my stash of cards as a just in case.  I created this card with that in mind.


For the background I used the Background Basics: Retro set stamped in fresh snow and pure poppy ink onto spring rain cardstock.  I rounded the corners and attached it to a white card base.


I used a white gel pen to fill in the center of the pure poppy image of the background.  The focal image is from Fillable Frames 1 collection which includes a die and coordinating stamp set.  The border image is stamped in spring rain and the sentiment in pure poppy.  I attached it with some foam pop dots on top of  some pure poppy saddle stitched ribbon.

Stay tuned when tomorrow I will share another project with you.  Have a wonderful Monday!

Hugs
Lisa

March 31, 2010

Happy Birthday, Mom

My parents birthdays are 1 week apart and their anniversary is 10 days after my mother's birthday.  And of course there is always Easter thrown in there somewhere.  This year since Easter falls in between my parents birthdays, we will be celebrating on Easter.  Kind of killing three birds with one stone.


I cased a card Nichole showcased in the countdown to March's release except I reversed the colors.  I made the large shaker box to house some goodies and gift card for mom and tied it with some white satin ribbon. 


For the card I decided to make my own embossed paper by using my Scor Pal and scored the lines at an angle.  I added some Martha Stewart's crystal fine glitter to the Hawaiian Shores flower.  The technique for the leaves was done by folding a small piece of scrap spring moss cardstock in half and running it through my crimper at an angle, while still folded I cut half of a leaf on the fold, after cutting unfold and viola instant leaf.  The sentiment is from Damask Designs and I also used the medium scallop die. 

Thanks for stopping in!

Hugs
Lisa

March 30, 2010

Happy Birthday, Dad

Tomorrow is my father's 82nd birthday.  I'm so glad we have another year to celebrate.  He's doing well at home but it is a little work.  He walks with a walker and there are certain things he can not do for himself and I'm so glad I'm here to help.  The way I look at it is that he took care of me all those years now it's my turn to give back and I wouldn't have it any other way.  With that being said I have a birthday card I made for him.  I always struggle with masculine birthday cards and I figure simple is better, a no frills kinda card.


I used some My Mind's Eye paper and rounded the one end using a plate, traced it and cut it out.  I attached it to a spring moss card base.  I stamped some images from Vintage Label in spring moss onto vintage cream cardstock and layered it on  dark chocolate.  The sentiment it from Birthday Basics stamped in dark chocolate.  I attached it by using some foam pop dots.  I also rounded the bottom corner.  See very simple and easy. 

Stop back tomorrow when I share a birthday card I made for my mother.

October 18, 2009

Timeless Templates

First, I'd like to apologize for being absent from here for so long. Sometimes life just gets in the way. So with that being said I'd like to share a project that I made for my sister for her birthday. I just love the Timeless Templates. There is so much you can do with them. I made my other sister a set like this except I used the pure poppy Green Tea Leaves patterned paper.


In the Pack a Picnic box I added some bath gels and lotions. I love the accordian flower I added to the top.


The Card Couture box is filled Celestial Seasonings tea bags which are a perfect fit. I used magnetic snaps by Basic Grey to help keep the flap closed.


This is the newest template which is called Cash and Carry. I like that you get three templates in this set. In my stash I had these Folio Closures by Colorbox that I used to help keep the box closed. This box is used to house a gift card.


My only concern with this box is that the bottom was open and I was afraid that the gift card would fall out. So I added the patterned paper that wraps all the way around the box. This will ensure that card stays in place. Lauren also had an idea to make a belly band that fits around the box. I'll have to try that for my next box.


Lastly, I had to make a card to coordinate with this set. I just love to make these accordian flowers. The embossed image on the spring moss cardstock is from Cuttlebug and I added a couple of score lines at the top and the bottom.


I hope you enjoy my projects today and thanks for stopping by.

August 23, 2009

August GSS entry

Happy Sunday! Today I'll be having the whole family over for dinner to celebrate my oldest brother's birthday. But before I get cooking I wanted to share one last project I entered in the August GSS.


For this project I stamped Guidelines Two in fresh snow onto some spring rain bitty box paper. For the flower I took a strip of white fabric and stamped Polka Dots Basics in pure poppy onto it then stitched the top and pulled the thread to make it gather. I then cut a piece of lemon tart cardstock and a piece of tulle using my nestabilities scalloped circle. The little red flower was cut out of red felt with a Cuttlebug's die. To attach everything, I sewed a white button threw all the layers. I am so enjoying using different textures on my cards other than cardstock.

Well I better go get dinner started. Thanks for stopping by today.

August 21, 2009

August GSS

Here are my entries in the August GSS. I made these for my sister as part of her birthday present. I'm making the same thing for my other sister for her birthday as well.


I had so much fun making these boxes.


I filled the Pack a Picnic box with all kinds of little things including a gift card holder that I forgot to photograph. I didn't fold down the top like it shows in the directions because I needed the extra height to the box.


My sister loves these colors and has it all through her home so I thought it was only appropriate to use them in these projects.


For the Card Couture I was originally going to use it as a recipe box but the recipe cards I got didn't fit. Even when I tries to cut them down. See my sister collects Roosters (not the real ones) and I found recipe cards at Michael's that had a rooster theme on them but I could only cut them down so far without cutting into the theme. So I decided to make it a tea box similar to the one Lauren Meador made. It's a good thing my sister likes tea!


And of course I had to make a card to complete the theme. I just love making these accordian flowers. I hope my sister enjoys them as much as I did making them. Tomorrow I'll share another project I made for the GSS.

Thanks for popping in!