May 27, 2010

Summer Banner

I love all the little banners that Kelly Lunceford makes for each season/holiday.  I have the perfect spot in my craft room (aka Happy Room) to hang such banners.  So I've been busy making banners for the holidays, just trying to get a jump start on things.  I just hung my summer banner since Memorial Day is this weekend and that usually jump starts the summer season.


I have so much patterned paper I figured this was a good way to use up some of it since I'm not a scrapper.


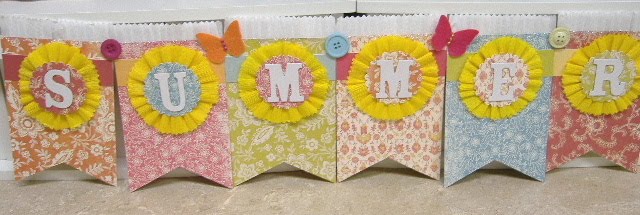
The paper I used is from My Mind's Eye, the yellow crepe paper I bought in a roll at the dollar store.  I thought it kinda looks like the sun behind the letters.  Speaking of the letters, I bought a pack of these white shimmer chipboard letters for $1.00 at Target.


I die cut a couple of butterflies from felt and added little rhinestones to them, attached some buttons and added some white crepe paper on the tops of each panel.


It's kind of hard to see but I did add some glitter to the tops of the panels as well.    So now I've got my summer, fall, halloween and thanksgiving banners completed and I'm off to work on my Christmas, winter and valentine banners. I know you all probably think I'm crazy to be so far ahead but I've got so many other projects on my list I wanted to get these out of the way.

Thanks for stopping by!

Hugs
Lisa

May 25, 2010

PTI May Blog Hop Challenge


Here we are at PTI's blog hop.  This month we are to create something using felt.  I really didn't have too much time to put into my project so this is what I came up with.


I had made this mini tissue holder awhile back but it was plain so I decided to embellish it with some felt flowers.  I do not have any of PTI's felt yet, I'm still waiting for certain colors to become available.  


I was a little leary about posting this pic.  I wasn't to crazy about how it turned out.  The felt I used was not the best quality but I figured I put the time into it so what the heck I'll post it.

I'm looking forward to seeing what everyone else has created and to get some good ideas and inspiration.

Happy hopping

Hugs
Lisa

May 22, 2010

Congrats

Hi everyone, hope your weekend is going well.  It's been an ugly rainy day so I thought I would clean out some closets and do some spring cleaning.  I have a long weekend coming up and I'm hoping to get the rest of my spring cleaning done, although I'd much rather be in my happy room working on some projects, these things need to get done. None the less I do have a card to share with you that I made the other day.


A very SAC card, here I used the Dotty Biscotti paper with a strip of raspberry fizz embossed with Picnic Plaid.  For the focal image I used the Mat Stack I die stamped with an image from the Round and Round set in raspberry fizz.  I punched out a circle from rustic cream cardstock and stamped a flower from the Beautiful Blossoms II set in sweet blush and the sentiment is from Communique Curves set stamped in raspberry fizz. 

Enjoy the rest of your weekend and hope to see you at the PTI Blog Hop.

Hugs
Lisa

May 19, 2010

How about a little masculine

Card that is.  I have alot of men in my life (family) and I'm always struggling with making birthday cards for them.  Here is one I made the other day which came to get rather quickly I might add.

 I picked up this patterned paper the other day at my LSS, I thought it would look good on a manly card.  I attached it to a kraft card base and cut out all the corners using a punch (sorry no sure what the name of the punch is).  I embossing some smokey shadow cardstock using a Cuttlebug embossing folder.


For the focal image I used the Nesties Label One die and the Vintage Labels set stamped in Versa Magic's sahara sand ink.  The sentiment is from Damask Designs stamped in smokey shadow. 

Well that's one manly card done and lots more to go so I better get crackin. 

Hugs
Lisa

May 18, 2010

Got to love those flower dies

Hello everyone!  I gotta tell you, I just love Papertrey Ink's new flower dies.  I love the fact that they have come out with coordinating dies to go with some of their stamp sets.  Today I'm going to show you 2 cards I made using one of the flower dies giving you two different looks.  For both cards I used kraft and hibiscus burst cardstock along with the cute little flower background stamp from Egg Hunt stamped in fresh snow.


For this flower I die cut from vellum 2 each of the small, medium and large flowers and attached them all with this cute fabric brad that goes so well with hibiscus burst. The leaves and stem are stamped in fresh snow as well as the sentiment which is from the Communique Curves set.  Finally I used some hibiscus burst saddle stitch ribbon to tie around the card.


For this card I used the same die and the coodinating stamp set for the flowers.  I attached jewels to the centers of the flowers.  The stem and leaves are stamped with spring moss pigment ink.  For some reason it doesn't show up very well on kraft paper.  For the bottom of the card I attached some white crepe paper to the hibiscus burst paper and tied up some spring moss twill ribbon.  I like the fact that you can get such different looks from the same die. 

Thanks for popping in!
Hugs
Lisa

May 17, 2010

Happy Happy Birthday

I always seem to have a hard time making little boy's birthday cards and I don't have any in my stash of cards as a just in case.  I created this card with that in mind.


For the background I used the Background Basics: Retro set stamped in fresh snow and pure poppy ink onto spring rain cardstock.  I rounded the corners and attached it to a white card base.


I used a white gel pen to fill in the center of the pure poppy image of the background.  The focal image is from Fillable Frames 1 collection which includes a die and coordinating stamp set.  The border image is stamped in spring rain and the sentiment in pure poppy.  I attached it with some foam pop dots on top of  some pure poppy saddle stitched ribbon.

Stay tuned when tomorrow I will share another project with you.  Have a wonderful Monday!

Hugs
Lisa

May 16, 2010

Graduation Time

Well it's that time of year when graduation parties will be starting.  Today I'm sharing a couple of cards I'll be giving to a few graduates.  I made them the same but switched out the colors to coordinate with their school colors.


For this card I used A Little Arygle stamp set in spring rain and prussian blue. 


For the focal image I used the Mat Stack 1 die from Papertrey Ink and a 1 3/4" punch.  The stamps are from the Third Anniversary Limited Edition Round and Round and a Communique Curves sentiment.  I then added two little jewels just to add alittle sparkle.


For this card I just changed the ink colors to pure poppy and true black and added to red jewels.


These went together rather quickly and I know I can crank one out if I need more graduation cards.

Thanks for stopping by and enjoy yor Sunday!

Hugs
Lisa

May 15, 2010

Thank You

Hi everyone!  I know it's been awhile since my last post, life sometimes gets in the way.  I back tonight to share a project with you that I made soon after I received my Dotty Biscotti paper.  I just love how it coordinates so well with kraft paper. 


I chose to use the cordinating plum pudding  paper for this project.  The card base is plum pudding where I used the picnic plaid impression plate from Papertrey Ink.  I cut a scallop edge using kraft cardstock with the meduim scallop die from PTI and attached a piece of the dotty biscotti paper at the bottom.


I found this really cool paper in my stash that frankly I forgot I had.  These smaller pieces were found inside of the large card bases.  It almost has a linen look to it.  So I decided to use these piece to make my flower with.  .


I followed Dawn McVey's tuturial on how to make these yummy flowers. First I stamped the Background Basics Text Style in dark chocolate then cut about 6 pieces using the largest scalloped flower die from PTI.  I then attached a button with some kraft button twine and a some plum pudding twill ribbon.  The sentiment is from Communique Curves set stamped with true black ink.

I hope you enjoyed my project and I will be sharing some more in the coming days.

Hugs
Lisa